

this tag tutorial was made using artwork by Anna Marine
scraps used was Wolf Girl by Pimp'd Designs
available HERE
ANIMATION by Lovey HERE
I used the one called whiteclustersparksbylovey
Mask by Weescotslass - Number10 HERE
Extras are available from my Fotki HERE
.................................................................
Start by opening a new canvas roughly 600x600 pixels
open up the moon copy and paste as a new layer arrange to the top left
open frame 8 from the kit copy and paste as a new layer
go to Image- rotate right by 20%
then open paper 11 from the kit copy and paste as a new layer
apply the WSL mask number 10
by going to Layers - Load/save mask - Load mask from disk
use these settings
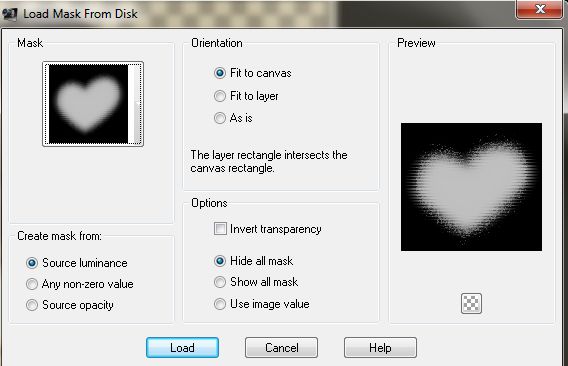
click load
go to Layers- merge group
slide this layer beneath the frame layer
copy and paste tube of choice,
then duplicate the tube and slide one beneath the frame
make the frame the active layer
and click inside it with the magic wand tool
go to modify - expand by 12
then make the bottom tube the active layer
and go to selections invert then hit the delete key to remove the excess
go to selections none
then make the top tube the active layer,
and erase the lower part of the tube that is overlapping the lower part of the frame
this makes the tube appear as if she is 'coming out of the frame'
this tube comes with the bats seperatly,
so add them as new layer
add a drop shadow
resixe entire tag by 80%
and your name plus artist copyright
I used Windsong font settings below

if you didnt want to try the animation
you could save your tag as a png.
adding animation
............................................................................
first open up the animation you want to use and delete any copyright layer
then just leave it open for now
then go back to PSP
copy merged and then paste into animation shop
then go to Animation - Animations- Properties
and choose canvas colour as white
or whatever colour you want to match the background of where you most post your tags
then copy and paste after current frame
keep repeating this step untill you have the same number of frames as your animation
if using the same animation as i did you will need 22 frames
on the animation you want use go to Edit- select all, then edit- copy
ensure propagate paste button is pressed
then on the the tag you want use go to Edit- select all
and paste into current frame
*make sure you line up with the centre of the sphere on your tag
save as a gif


No comments:
Post a Comment